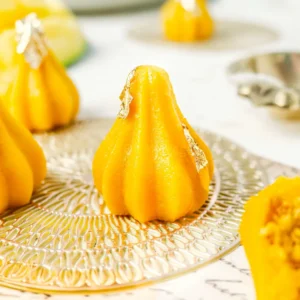
🥭 Mango Modak Recipe
Mango modak offers a twist on the traditional Maharashtrian sweet, with a mango-flavoured dough and a coconut, jaggery, and mango stuffing.
Ingredients
For the Mango Modak Dough
- 150 ml water
- 150 ml mango puree
- 1 pinch sea salt
- ½ teaspoon ghee
- 100 g rice flour
For the Mango Modak Filling
- ⅔ teaspoon ghee
- 65 g grated fresh coconut
- 35 g grated jaggery
- 35 ml mango puree
- 1 pinch nutmeg powder
- 1 pinch cardamom powder
Instructions
Make the Mango Modak Dough
- Add 150 ml water, 150 ml mango puree, 1 pinch sea salt, and ½ teaspoon ghee to a large saucepan set over medium-high heat. Bring the mixture to a rolling boil. Once boiling, add 100 g rice flour and quickly mix. Turn off the heat, cover the pan, and leave to steam in the residual heat for at least 10 minutes.
Make the Mango Modak Filling
- Add ⅔ teaspoon ghee to a pan over medium heat. Once the ghee has melted, add 65 g grated fresh coconut. Cook gently, stirring continuously, until the coconut turns golden. Next, add 35 g grated jaggery. Cook until the jaggery melts and the mixture becomes thick, then add 35 ml mango puree. Stir to mix. Cook the filling until it's thick, yet remains lovely and moist.
- Turn off the heat and season the mango modak filling with 1 pinch nutmeg powder and 1 pinch cardamom powder. Leave to cool down.
Shape the Mango Modak
- Transfer the mango modak dough to a large parat or mixing bowl. Grease your hands with ghee and knead the dough* for 5-10 minutes, or until it forms a smooth, crack-free mixture. Test by rolling a small portion into a ball; it shouldn't have any cracks. Cover the dough with a damp cloth.
- Open your mango modak mould and grease it with ghee.
- Grease your hands and fingers (to prevent the dough from sticking) and stuff the mould with mango modak dough. Be sure to press the dough into every corner. Use a finger to push the dough to the sides of the mould, creating an empty space in the middle.
- Stuff the empty centre with the mango modak filling. Use the excess dough you pushed out to close the bottom of the modak.
- Carefully open the modak mould and take out your fully formed mango modak. Place it on a greased steamer plate and cover with a damp cloth. Repeat this process with all the remaining modak.
Cook the Mango Modak
- Add water to the bottom of your steamer pot and bring it to a boil over medium heat. Carefully lower the plates with the mango modak into the steamer, and cover the pot with a lid. Steam for 10 minutes. Turn off the heat and let the modak sit in the steamer for a further few minutes before serving.
Notes
*You can use a dough attachment on a KitchenAid or similar mixer. This is a great alternative if you struggle with kneading for long periods of time or prefer a mess-free option.
Equipment


Nutrition
Calories: 28kcalCarbohydrates: 5gProtein: 0.3gFat: 1gSaturated Fat: 1gPolyunsaturated Fat: 0.03gMonounsaturated Fat: 0.1gCholesterol: 1mgSodium: 2mgPotassium: 21mgFiber: 0.4gSugar: 2gVitamin A: 68IUVitamin C: 2mgCalcium: 2mgIron: 0.1mg
Tried this recipe?Please consider leaving a review!
