Karanji, Maharashtrian Coconut Pastries
Just look at that crispy, crunchy, golden brown ghee-soaked pastry. It’s irresistible! Inside, the combination of sweet, aromatic, toasted coconut accented with nutty poppy seeds, sesame seeds, and creamy crushed cashews makes karanji a crowdpleaser (even for people who aren’t fond of coconut). Add a pinch of nutmeg and a dash of floral cardamom, and you’ve got all the markings of a characteristically sweet and subtly spiced Indian sweet everyone is sure to love.

Every Holi, every Diwali, and every Ganesh Chaturthi, I cook a big platter of Maharashtrian karanji for the household during the holiday period. No matter how I decorate the house with flowers and diyas or how many splendorous sarees I wear, the festivities never seem complete without a collection of festive goodies to share with family, friends, and neighbours!
Of course, although this recipe is one of my must-have festival treats, you don’t need a reason to enjoy the Maharashtrian dessert. Sometimes, I make sweet pastries to pack in lunch boxes as treats or take on picnics (since they travel so well!) When I first tasted the mouthwatering sweets, I thought they were like sweet versions of a regional recipe from my home county, Cornish pasties… as it turns out, they’re nothing alike, but both are great for on-the-go!
Karanji is a recipe that some people might baulk away from and never attempt, thinking it looks too complicated. But after much practising, this tried-and-tested recipe is a foolproof and fail-safe way for beginners to make easy karanji. All in less than 30 minutes of hands-on cooking time.
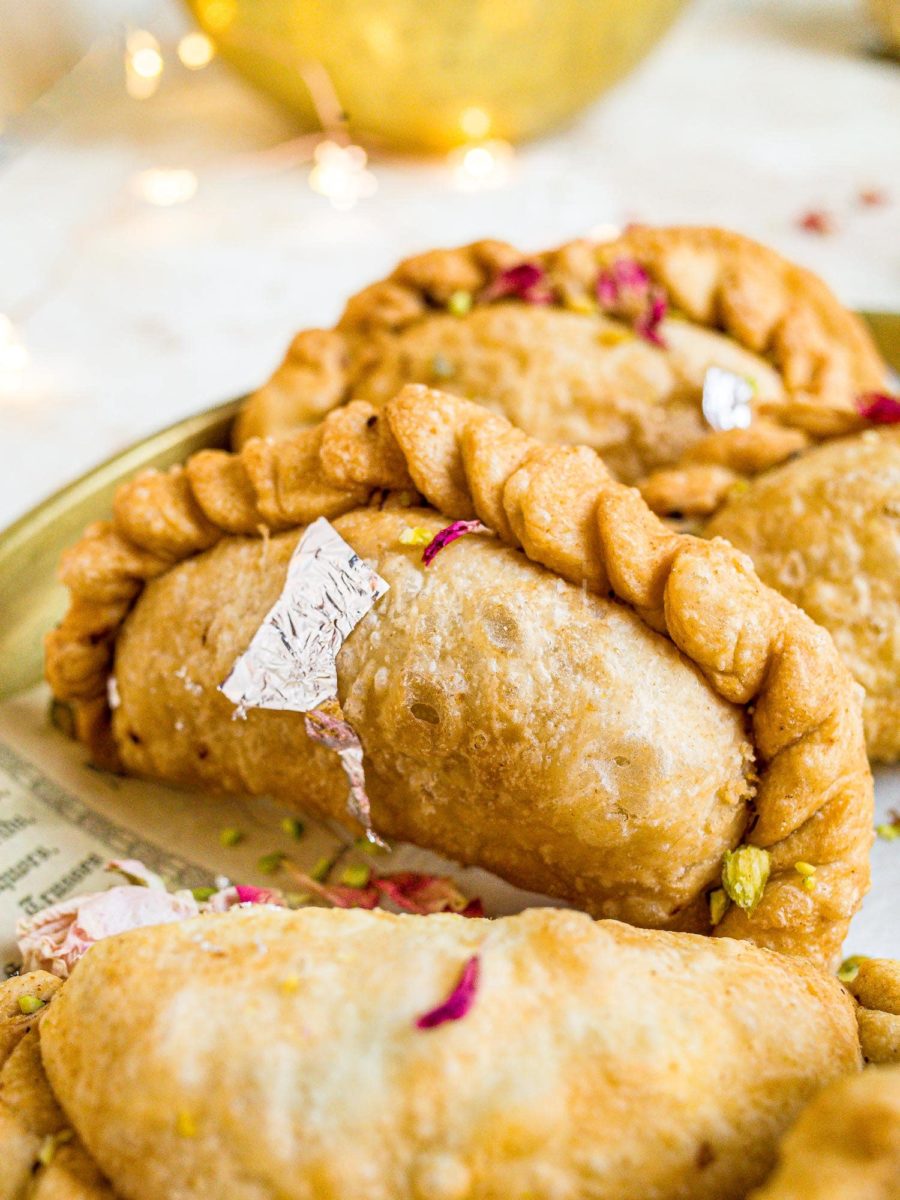
What is Karanji?
Karanji are delightful sweet pastries made with a crisp pastry as the outer layer, then stuffed with coconut, chopped nuts, poppy seeds, semolina, cardamom, and nutmeg, sweetened with either jaggery or sugar. They are delicious!
Along with other dishes like seviyan kheer and gulab jamun, serving this Maharashtrian dessert is a must for large Indian festivals like Ganesh Chaturthi, Holi, and Diwali.
People often offer a few pastries as prasad (food offered during puja/prayer), then let the family enjoy the rest.
I’m particularly fond of making traditional Maharashtrian karanji for Ganesh Chaturthi and Diwali! My festivities aren’t complete without the tasty little treats.
Are Karanji and Gujiya the Same?
No, this Maharshtrian recipe and gujiya aren’t the same. Although the two pastries may look identical at first glance, the difference lies in the respective fillings.
While karanji originates from Maharashtra, gujiya is popular in North India, especially Uttar Pradesh. This recipe boasts a dry coconut and mixed nuts filling, while gujiya has a creamier stuffing made from rich khoya/mawa (sweetened milk solids). This divergence makes the two desserts taste distinct.
Most states across India have different regional names for these two desserts, depending on the local language. For example, in Bihar, gujiya are locally known as pedakiya, while in Gujarat, people know them by ghughra. South Indian states also have separate names; somas in Tamil, garijalu or kajjikayalu in Telugu, and karjikayi or karigadubu in Kannada.

Ingredients for Maharashtrian Karanji
This straightforward recipe, featuring dry coconut, calls for basic pantry staples in the pastry and traditional Maharashtrian cooking ingredients in the filling – poppy seeds, sesame seeds, nuts, and aromatic spices. The specific quantities are provided in the recipe card below.
Karanji Cover Recipe
- Plain flour (All-purpose flour or maida) is the main ingredient for the pastry. Don’t substitute wholemeal flour/atta.
- Ghee gives this dessert its characteristic crispy exterior and adds a rich, buttery flavour to the dough. You can use oil to make this a vegan karanji recipe, but if plant-based needs aren’t a consideration for you, the most authentic taste, opt for ghee.
- Water is needed to bring the dough together.
- Sea salt adds flavour to the dough casing — don’t skip it!
Stuffing for Karanji
- Dry coconut provides a gorgeous nutty tropical taste to the karanji. I use desiccated coconut, but dry coconut also works. Fresh coconut isn’t suitable; it’s too wet.
- Fine semolina in small amounts absorbs any excess moisture, ensuring the filling is dry. It also emphasizes the nutty flavours!
- White poppy seeds are mild, nutty, and subtly fruity, adding complexity to the karanji.
- White sesame seeds add natural sweetness.
- Sugar or jaggery sweetens the filling, making it irresistible.
- Cashews are mild, buttery, and sweet, pairing wonderfully with the other components.
- Almonds bring a nutty earthiness to the Maharashtrian sweet.
- Nutmeg is warm, earthy, and woodsy, infusing a delightful and indescribable aroma to the karanji pastries.
- Cardamon adds hints of floral sweetness.

How to Make Karanji at Home
This recipe for karanji breaks down the processes into a straightforward, easy-to-understand methodology. Read the steps a few times to familiarize yourself with the approach, and when you go to cook the karanji, it will be like second nature!
More detailed instructions can be found in the recipe card below, along with ingredient quantities.
- Mix the dough. Add salt to the flour and mix well. Next, add the melted ghee and work it into the flour. Add water until a dough forms, and knead gently to bring it together.
- Let the dough rest for around 15 minutes while you make the filling.
- Cook the filling by dry-roasting desiccated coconut, semolina, plus poppy and sesame seeds. Cool the mixture then add sugar, chopped almonds, cashews, nutmeg powder, and cardamom powder to a blender. Blend to a coarse powder.
- Make the karanji by separating the dough into portions. Roll each piece out into a disk, then fill it with stuffing. Shape using a karanji mould, or use your hands to pleat the pastry closed.
- Cook the karanji by deep-frying until light golden brown. You can also air-fry or bake the karanji (see below).
Ways to Cook Karanji
Typically, people deep-fry karanji to achieve the characteristic golden-brown color and tempting crispy pastry. It’s the method I use most often — including in the recipe card below.
However, if you want to make healthier Maharashtrian treats or don’t want to go through the stress of deep-frying at home, thankfully, there are a few other options.
- Air fryer karanji: To make karanji in the air fryer, make the sweet pastries as instructed, then preheat your ary fryer. Arrange the karanji in a layer, brush them with oil, and cook for around 15 minutes at 180 C (360 F).
- Baked karanji: This method will be slightly more brown and less crispy but delicious. It’s also the most accessible, healthy way to karanji! Preheat the oven to 200 C (390 F), brush the karanji with oil, then bake for around 25 minutes. You may have to check them halfway through.
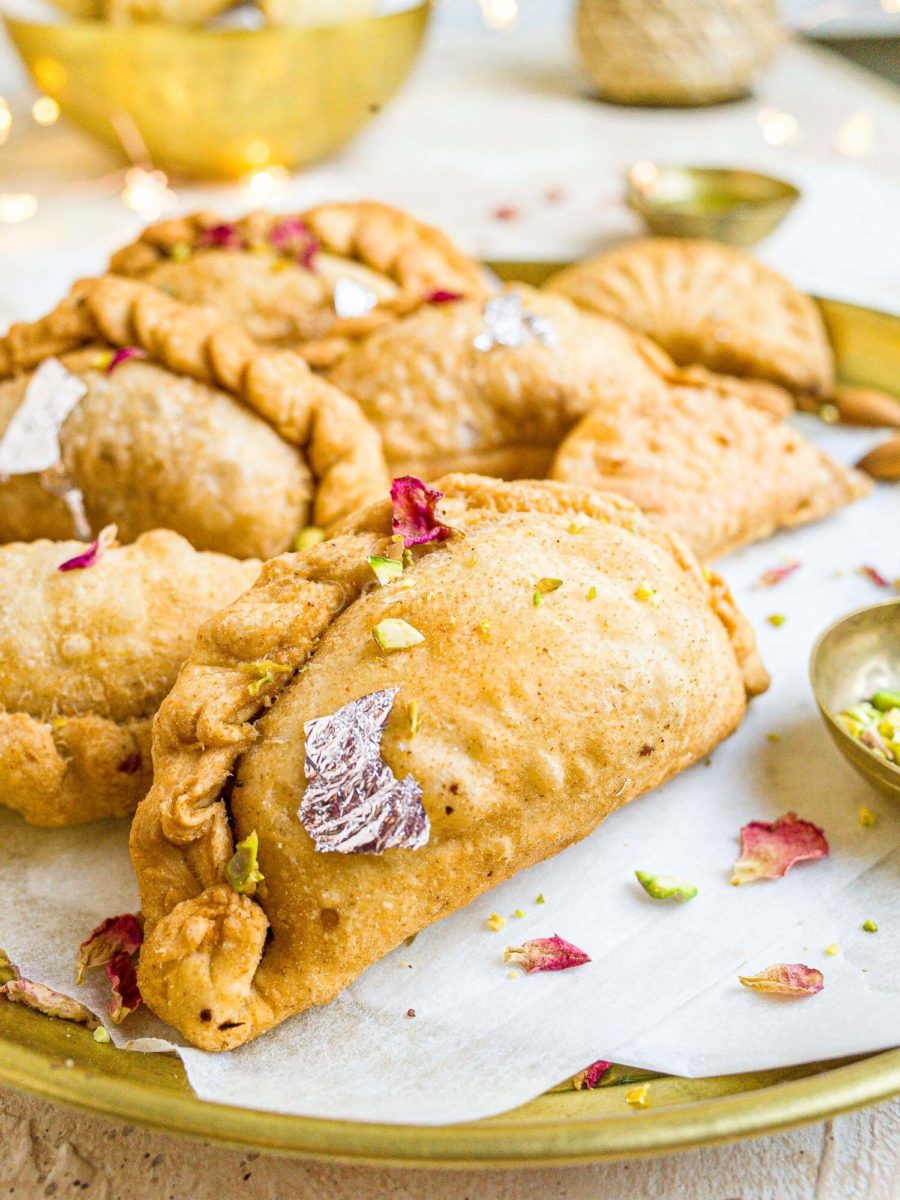
How to Use a Gujiya Mold
If you’re not confident in your ability to neatly pleat the karanji, I recommend you purchase a karanji mould! It makes the whole process so much easier for beginners. I used a simple, inexpensive plastic mould to create the smaller karanji in these blog photos.
What is a Karanji Mold?
Karanji moulds, crafted from plastic, wood, or metal, are small tools for shaping the traditional Maharashtrian karanjis.
They come in various shapes and sizes, with some imprinting simple designs while others offer more elaborate, intricate designs like in my photos.
You can usually buy karanji moulds from your local Indian supermarket or tableware store. Check online, too! If you don’t have any other options, Amazon also stocks karanji moulds. Just click the link to shop. You can also use dumpling makers if you’re not worried about a fancy design!
Using karanji moulds is effortless:
- Roll your dough ball into a small circle (this depends on the size of your karanji mould).
- Open the mould (some have a latch), and place the dough circle on top of the mould, flat.
- Spoon your filling into the centre of the dough.
- Carefully close the karanji mould. Press it together, exerting some pressure.
- Open the karanji mould and carefully remove your shaped karanji! You may have to remove some excess dough from the top, where the karanji is sealed shut.
Tip: You can grease the karanji moulds with oil or ghee to prevent the dough from sticking to the mould.
Variations for This Recipe
While the karanji recipe here is a tried and tested household favourite, there are a few variations you can try:
- Karanji without poppy seeds is an easy adjustment to make! Just remove poppy seeds from the recipe. There’s no need to make any further changes.
- Karanji with jaggery is an easy swap to make. Substitute white sugar for equal amounts of grated jaggery. Jaggery, also known as “gud” or “gur” in Hindi or Marathi, has a maple caramel flavour more intense than white sugar.
- Coconut and rose karanji is a festive variation with a more intense floral flavour. Add a drip of rose essence or rose water to the filling.
- Karanji with fresh coconut needs more cooking than karanji with dried coconut and doesn’t have the same shelf life. Karanji with fresh coconut will last in the fridge for around three days.

Tips to Make the Best Karanji
Making karanji that leaves everyone craving more requires a blend of elements inherent in most Indian cooking: practice, cooking with love, and having a solid recipe. And … this is absolutely a solid recipe, although you’ll have to cover the other two points!
Here are a few pointers:
- Don’t over-knead the dough — this will make the karanji too soft.
- Let the dough rest for around 10-20 minutes.
- Draw out the aroma of the ingredients by not skipping the dry roasting step! Be very careful to not burn the coconut or other ingredients, or they’ll become bitter (start again if this happens), but toasting them is vital for the extra flavour it provides.
- Use a karanji mould if you’re not confident in your ability to seal the karanji, otherwise, the filling might seep into the oil.
- Don’t overcrowd the karanji while frying, or you’ll risk the karanji becoming greasy and causing uneven browning.
How to Make Karanji Crispy
If you follow this easy Maharashtrian recipe to the tee, the karanji will be as crispy as can be! However, there are a few things you need to pay particular attention to.
- Ensure that the outer karanji pastry dough maintains the right consistency. The water-to-flour ratio is crucial; if the dough is too soft, the karanji won’t turn crispy but rather stay soft over time.
- Don’t skimp on the ghee! Ghee is what gives the karanji pastry its distinctive flaky, crispy bite.
- Not waiting for the oil to heat up can cause the karanji to soak up oil, therefore becoming greasy (nobody wants that!) as opposed to crispy.
This Recipe Is …

Karanji, Maharashtrian Coconut Pastries
Ingredients
For the Dough
- 180 g plain flour all-purpose flour in the U.S., maida
- salt to taste
- 1 ½ tablespoon ghee
- 5 tablespoon water
For the Karanji Filling
- 35 g desiccated coconut
- 2 ½ teaspoon fine ground semolina rava/sooji
- 2 ½ teaspoon white poppy seeds
- 2 ½ teaspoon white sesame seeds
- 1 ½ tablespoon white sugar
- 9 cashews
- 8 almonds
- ¼ teaspoon nutmeg powder
- ¼ teaspoon cardamom powder
For Frying
- 1 litre neutral oil for deep frying*
Instructions
Make the Karanji Dough
- Add salt to 180 g plain flour and mix in. Next, add 1 ½ tablespoon ghee (melted) and work it into the flour with your fingers, until it resembles breadcrumbs. Slowly add 5 tablespoon water until a dough forms, and knead gently to bring it together. Don't over-knead the dough!
- Let the dough rest, covered, for around 15 minutes while you make the filling.
Make the Karanji Filling
- Cook the filling by dry-roasting 35 g desiccated coconut in a small non-stick pan until lightly golden and fragrant. Set aside and leave it to cool.
- Next, dry-roast 2 ½ teaspoon fine ground semolina, stirring constantly, until it smells aromatic, around one minute. Place into the same bowl as the coconut.
- Finally, dry-roast 2 ½ teaspoon white poppy seeds and 2 ½ teaspoon white sesame seeds until they start to pop. Cool in the same bowl as the coconut and semolina.
- Once the mixture is cool, add it to a blender along with 1 ½ tablespoon white sugar, 9 cashews (chopped), 8 almonds (chopped), ¼ teaspoon nutmeg powder, and ¼ teaspoon cardamom powder. Blend to a coarse powder and set aside.
Shape the Karanji
- Separate the dough into equal-sized balls. Working with one ball at a time, cover the rest. Roll one ball into a small disc. Fill it with the stuffing and pleat to close, or, for a neater effect, use the karanji mould.
- To use the karanji mould, roll your dough ball into a small circle (depending on the size of your mould). Open the mould (most have a latch), and place the dough circle flat on top of the mould. Spoon the filling into the centre of the dough and carefully close the mould. Press the mould together, exerting some pressure. Open the mould and carefully remove the shaped karanji. You may need to trim excess dough.
- Repeat the process with the remaining dough balls. Keep the shaped karanji and unshaped dough balls covered with a damp towel to avoid drying out.
Cook the Karanji
- Cook the karanji by deep-frying in 1 litre neutral oil until light golden brown. You can also air-fry or bake the karanji (see below)*. Drain on kitchen paper and cool before eating.
- Optionally, decorate the karanji with edible silver leaf (vark) and dried rose petals.





Cocnut’s my favourite and these tasted so good. I’ve made them a few times now, faultless recipe!