Vada Pav — The Best Vegan Spicy Bombay Burger
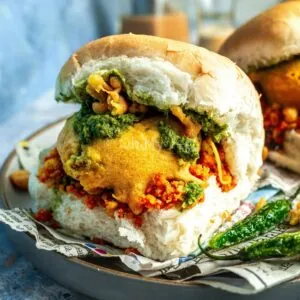
Vada pav is made from soft, pillowy bread rolls slathered with herby, zesty, fiery, sweet, and sour chutneys, with a heartily spiced potato patty sandwiched in between.

Rickshaws are weaving through the traffic, horns are honking, women in colourful sarees and salwar suits run across the roads, and there’s heavy heat hanging in the air.
In the beating heart of Mumbai, during the bustling lunch hour, a 70-year-old street food stall stands directly opposite the imposing grandeur of the Victorian Gothic Chhatrapati Shivaji Terminus.
Here, amid the flurry of activity, men in suits gather around, forming a lively scene. The owner piles green chutney and scarlet-red garlic chutney on fluffy pav, sandwiches a vada between them, throws on a few salted chilis, wraps it all up in paper, and the men rush to catch the local train, vada pav in hand.
For Mumbaikars, vada pav is a symbol of the city. The street food, which has been affectionately dubbed the Indian “Bombay burger,” is a testament to the innovation of Indian people to make simple ingredients into an explosion of flavour.
Making vada pav rival those street sellers is difficult, but with guidance (this recipe!), you can enjoy this street food in the comfort of your home … with minimum effort.

Is this Recipe Gluten-Free, Vegan, Nut-Free, and Soy-Free?
I adore developing recipes suitable for everyone to enjoy, regardless of their dietary needs and preferences. Luckily, vada pav fits that description! This street-style vada pav recipe is naturally vegan, soy-free, nut-free, and dairy-free. It’s also easily made gluten-free with only one substitution. In short, it’s the perfect Bombay burger recipe.
This vada pav recipe is vegan because I used the simple white bread rolls available in the U.K., instead of the more traditional Indian pav. Classic Indian pav — bread rolls enriched with milk and butter — are soft, fluffy, and ideal for vegetarians. However, since they aren’t suitable for vegans and can be hard to find outside India, substitute them for any bread with a pillowy, delicate crumb if needed.
To make a gluten-free vada pav recipe, you’ll have to switch out the bread roll/pav for a gluten-free version. That’s it! The batata vada is naturally gluten-free, as are the chutneys.
What are the Ingredients for Authentic Vada Pav?
- Pav are soft and fluffy bread rolls. I used standard vegan bread rolls from my local grocery store, but if you can find proper Indian pav, you can use those instead. Note that Indian pav traditionally includes milk and butter, meaning it’s not suitable for vegans.
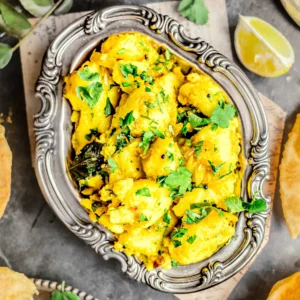
- Batata vada is comparable to a burger patty. Potatoes — known as batata in Marathi — are the main element, mashed then spiced with punchy black mustard seeds, curry leaves, aromatic ginger-garlic paste, green chili, sweet white onions, earthy turmeric, and a hint of garam masala. We then shape the mixture into patties before coating them in a thick and flowing nutty chickpea flour batter, ready to be fried until golden brown.
- Dry garlic chutney is a spicy, fiery, and heavily textured chutney that we spread over the bread rolls. Read more details in the section “Spicy Dry Garlic Chutney for Vada Pav.”
- Green coriander chutney is earthy, zesty, and packed with fresh herbs. It’s a welcome addition to the complex flavor sensations going on in this recipe. Read more in the section “Green Chutney for Vada Pav.”
- Tamarind Chutney is characteristically sweet and sour. It’s made with fresh tamarind pulp, jaggery or sugar, and cumin seeds. You can read more in the section “Sweet Tamarind Chutney for Mumbai-Style Vada Pav.“
- Salted and fried green chilis are mandatory to serve alongside vada pav! That way, you can adjust the spice level to your liking and munch on them alongside the Bombay burger.

How to Make Easy Vada Pav at Home
- Make a batter from chickpea flour, turmeric powder, sea salt, ajwain, and water. We’ll use this to make crispy batter bits and to coat the batata vada in a crunchy, nutty shell!
- Make the batata vada from potato, spices, and fresh herbs. The vegan batata vada is the main element and is soft, flavorsome, peppery, and citrusy.
- Make the chutneys. You can make these in advance to speed up the process! We’ll make our vada pav with green chutney, garlic chutney, and sweet tamarind chutney.
- Fry everything. We’ll fry some batter bits, the batata vada, and fiery green chilis. If you want to make vada pav without deep frying, air-fry the batata vada at 200 degrees Celsius (392 degrees Fahrenheit) for 10 minutes. Just like your air fryer with parchment (baking) paper! This method makes for a healthy vada pav variation.
- Assemble! Spread your chutneys over the bread rolls, add the batata vada, and tuck into your delicious Mumbai street-style vada pav.
You can find more detailed instructions in the vada pav recipe card below.

Vada Pav Origins and History
When Did Potatoes and Bread Arrive in India?
Interestingly, the two main ingredients of vada pav — bread rolls and potatoes — aren’t native to India. Stick with me, and we’ll explore this iconic Mumbai street food’s origins and history.
Portuguese traders and colonists first arrived on the West coast of India in 1498. By the 1500s, Mumbai (known in Portuguese as Bom Bahia) was the primary sea harbor for the Portuguese. The Konkan region, which includes a thin stretch of land along the Maharashtrian coastline (including Mumbai), Goa, and a small part of modern Karnataka, was under Portuguese control until the early 1960s. Needless to say, some remnants of Portuguese rule have remained in the area, including food.
It was the Portuguese who, in the early 17th century, brought a hardy and versatile South American crop — the potato — to India. At first, potato’s influence was restricted to a small area. That all changed when the British East India Company supplied Indian farmers with cheap seed potatoes, to replace the country’s main carbohydrate. Soon, the potato spread like wildfire, infiltrating its way into the region’s traditional fare. Similarly, baked bread — like pav — was popularized by the Portuguese. Previously, Indian people had relied mostly on unleavened flatbreads, like chapati, jowar bhakri, and naan. Evidence of this food exchange remains in the modern Marathi words, “batata,” a loan from Portuguese, and “pav,” a variant of the Portuguese word for bread, “pão.”
When was the Indian Burger, Vada Pav, Created?
Bread and potatoes may have arrived on India’s shores during the 17th century, but vada pav, despite its cult-like status, is notably of more contemporary origin. History suggests that native Mumbaikar Ashok Vaidya created the renowned street food in the 1960s. Inspired by a neighboring street food vendor selling omelet-stuffed pav, Vaidya took a different path. He decided to fuse the already beloved batata vada with pav and an array of chutneys, creating a culinary sensation that was an almost instant success. The timing was perfect — the Maharashtrian state parliament was encouraging entrepreneurial spirit, hoping to replicate the success of the Udupi food movement in neighboring Karnataka, which popularised South Indian foods like dosa and idli nationwide. Simultaneously, worker strikes in the upcoming decades led to a rise of street food vendors selling the delicious Mumbai vada pav.
The “Bombay burger,” as it’s still sometimes called today, was the ideal lunch for a minimum wage worker commuting to work on the Mumbai local trains. It was cheap (the meal still only costs around ₹20 —less than £0.20) and easily transportable, often hurriedly wrapped in yesterday’s newspaper. Ultimately, the ingredients in vada pav may not be authentically Indian, but Mumbaikars have made them their own. Nobody can argue that any dish represents the bustling metropolitan better than vada pav.

The Best Chutney for Vada Pav
Much like an exceptional spicy mayonnaise or ranch dressing will elevate a classic vegetarian burger to new heights, homemade chutneys make all the difference between an average “meh” vada pav and a blow-your-socks-off Mumbai vada pav. While each recipe for vada pav will likely have a different combination of chutneys, I enjoy spooning on all three. Individually, each quick vada pav chutney recipe has a role to play in the complex dimension of flavours and textures we’re going to build. Let’s explore how:
Green Chutney for Vada Pav
Green chutney is a mainstay across most Indian street food recipes, including ragda pattice, dahi puri chaat bombs, palak patta chaat, and samosa chaat. Although there may be many variations of the recipe, mine is simple. Find the recipe for my green chutney here — it’s perfect for all types of chaat.
Green chutney has the ideal balance of fresh, earthy, herbiness from coriander — stem and leaves —, punchy spiciness from green chilis and raw garlic, sweet warmth from cumin powder, and a dash of saltiness from the chaat masala. I like to spoon the thick, vibrant green chutney over one-half of the bread so it soaks into the fluffy rolls. Yum!
Spicy Dry Garlic Chutney for Vada Pav
Unlike the other two chutneys used on vada pav, this iconic Maharashtrian dry garlic chutney is unique. The spicy, pungent, and nutty flavor perfectly complements all the additional components. On the other hand, the crispy, dry texture makes for a pleasant contrast to the fluffy pav and buttery-soft batata vada.
The dry garlic chutney has a distinctive taste acquired from traditional Maharashtrian ingredients, including toasted and aromatic dried coconut, nutty sesame seeds, and robustly fiery, sweet, red chili powder. The dominant flavor, however, is the buttery notes of blistered garlic, while the texture comes from crunchy fried batter bits. I don’t include peanuts, as this recipe is nut-free.
The chutney is addictively moreish and emphasizes the famously spicy flavors Mumbai-style street food is known for. However, above all else, it delivers surprisingly sweet and toasty undertones that cement the dry garlic chutney as a must for all vada pav recipes.
Sweet Tamarind Chutney for Mumbai-Style Vada Pav
Another cornerstone of Indian street food dishes, sweet tamarind chutney — known in Hindi as imli chutney — is gloriously thick with a balanced tangy, sweet, sour, and salty flavor profile.
While recipes vary, the base ingredients are always fresh tamarind pulp, jaggery, red chili, and cumin seeds. Other popular additions include dates, fennel seeds, ginger powder, and black salt.
This chutney tastes fantastic spread over the bread rolls or drizzled directly on top of the batata vada. I always like to make a little extra so we can add more as required!

This Step-by-Step Recipe Is:
Vada Pav — The Best Vegan Spicy Bombay Burger Recipe
Ingredients
- 6 vegan white bread rolls or traditional pav
- 1 litre oil for deep frying
For the Batter
- 150 g chickpea flour besan, garbanzo bean flour
- ¼ teaspoon turmeric powder
- ¼ teaspoon ajwain
- 150 ml water
- 1 teaspoon water to adjust consistency
For the Batata Vada
- 3 medium potato 3 medium potatoes = 300g
- 2 teaspoon oil
- ½ teaspoon black mustard seeds
- 1 green finger chilli finely chopped
- 1 sprig fresh curry leaves
- ½ white onion ½ onion = 20g
- ¼ teaspoon ginger garlic paste
- ¼ teaspoon turmeric powder
- sea salt to taste
- ⅛ teaspoon garam masala
- 5 strands fresh coriander cilantro, chopped
For the Green Coriander Chutney
- 1 full green chutney recipe
For the Tamarind Chutney
- 50 ml tamarind paste
- 40 g grated jaggery
- 50 g pitted dates
- sea salt to taste
- ¼ teaspoon cumin powder
- ¼ teaspoon fennel powder
- ¼ teaspoon red chilli powder or to taste
- 1 pinch ginger powder
For the Dry Garlic Chutney
- 40 g garlic
- 40 g batter bits
- 1 teaspoon sesame seeds
- 2 tablespoon desiccated coconut
- sea salt to taste
- 1 tablespoon deggi mirch mild red chilli powder
Fried Green Chilis
- 20 g green finger chillies
- fine ground sea salt to taste
Instructions
Make the Batter
- Sieve 150 g chickpea flour and ¼ teaspoon turmeric powder into a mixing bowl. Crush ¼ teaspoon ajwain between your palms, then add them too. Finally, pour in 150 ml water and whisk the batter until smooth. You may need an extra 1 teaspoon water to adjust the consistency.
- Let the batter rest (covered with a plate) for around 20 minutes, while you make the batata vada.
Make the Batata Vada
- Add plenty of water to a large saucepan and bring to a rolling boil over medium-high heat. Once boiling, add 3 medium potato. Boil until tender, then drain. Cool slightly and peel.
- Add the potatoes to another mixing bowl, and mash until mostly smooth (some texture is fine).
- Heat 2 teaspoon oil in a small tadka pan over low-medium heat. Add ½ teaspoon black mustard seeds and wait for them to pop. Once the pop, immediately add 1 green finger chilli (chopped) and 1 sprig fresh curry leaves. They will splutter, so be careful! Next, add ½ white onion (chopped), and sauté until softened. Then add ¼ teaspoon ginger garlic paste and ¼ teaspoon turmeric powder, cooking until the raw smell has faded. Turn off the heat.
- Pour the tadka (tempering) over the mashed potatoes. Sprinkle over sea salt (to taste), ⅛ teaspoon garam masala, and 5 strands fresh coriander (chopped). Mix everything well and form into small patties (this recipe makes six by default, but it' s adjustable).
Make the Chutneys
- Follow my recipe for green chutney (linked). You want 1 full green chutney recipe.
- Make the tamarind chutney by adding 50 ml tamarind paste, 40 g grated jaggery, 50 g pitted dates, sea salt (to taste), ¼ teaspoon cumin powder, ¼ teaspoon fennel powder, ¼ teaspoon red chilli powder, and 1 pinch ginger powder to a small saucepan. Bring to a boil and cook for two minutes, or until the mixture reduces and thickens.
- Cool the mixture, then use a hand blender or mixer grinder to puree and pass it through a sieve. Set aside.
- Make the dry garlic chutney by heating 1 litre oil in a large kadai or deep fat fryer. Heat the oil to 160℃ (325℉). Once the oil has heated, slowly pour some of the batter through a slotted spoon (you want small pieces), or let it drop from your fingers. Fry the batter bits until golden brown. Drain on a paper towel.
- Next, dry roast (without oil) 40 g garlic until blistered. Place them in a blender. Repeat the same dry-roasting process for 1 teaspoon sesame seeds (roasting until aromatic), then 2 tablespoon desiccated coconut. Add these to the blender along with 40 g batter bits (any extra can go in your burgers), sea salt to taste, and 1 tablespoon deggi mirch. Pulse the mixture until it's combined.
Fry the Batata Vada
- Dip the potato patties (batata vada) into the batter until fully coated. Carefully lower them into the same oil for deep-frying. Don't overcrowd the pan; fry three at a time, until golden. Remove with a slotted spoon and drain excess oil. Repeat.
- If you have any leftover batter, you can make more batter pieces. These are delicious served in the burger or on the side. Once done, turn off the stove or deep fat fryer.
Fry the Green Chillies
- Using a knife, score 20 g green finger chillies lengthways to make a small slit. Lower them into the deep frying oil and cook in the residual heat until blistered. Be careful! They can spit oil. Remove and drain excess oil, then sprinkle with fine ground sea salt.
Assemble the Vada Pav
- Cut each bread roll into half. Spread coriander chutney on the top half and tamarind chutney on the bottom half. Sprinkle the dry garlic chutney over the tamarind chutney. Next, place a batata vada on top, scatter over batter bits, and close the pav/bread rolls. Serve with fried green chillies on the side (or in the Bombay burger if you prefer!).


Absolutely hooked on this Mumbai-style Vada Pav recipe, well done Oh My Veg! The combo of spiced potato patty, fluffy rolls and chutneys is pure magic. The salted chillies and trio of chutneys, mindblowing.
Plus, the backstory on how this street food legend came to be was really interesting, who’d have thought it! Best of all it was easy to make with common ingredients.
Have you tried it cold? I really enjoyed it, there wasn’t any leftovers but I did wonder about cooking extra next time.
While the vada pav undeniably taste best hot, the flavours and textures are still great when cold! Sometimes I make extras and pack them for lunch. Having said that, since the only thing that needs to be hot is the batata vada, it’s really easy to re-heat leftover vada in the microwave, in the oven, or on the stovetop. Hope this helps!