Vegetarian Nasi Goreng (Indonesian Fried Rice)
What happens when day-old rice meets a hot wok, mixes with a caramel-rich umami sauce, a handful of vegetables, and crispy fried shallots, then is topped with a fried egg (with a yolk so runny it becomes part of the sauce)? Vegetarian nasi goreng, that’s what!

If you’ve experienced living in a house share, the thought of food will either send shivers up your spine in terror or get your taste buds tingling.
Luckily for me — although I’m glad to be out of that phase in my life now — it was actually a time of great cultural enrichment. From a hoard of housemates, I learnt how to make dishes like tortang talong, aloo bhujia sabji, and this vegetarian nasi goreng.
The latter was taught to me by a lovely Indonesian woman who was studying to be a nurse. We’d often exchange plates: she loved sabudana khichdi (Random, yet true!), while I always adored the special vegetarian nasi goreng she made for me.
Often, she’d make the dish in the morning, after a long night shift. The smell of kecap manis caramelising in the pan was too tempting to resist; it was the best wake-up alarm.
I recently ordered vegetarian nasi goreng at a street-side stall in central London — even ate it standing up because I couldn’t wait for a bench to free up — but it just wasn’t the same as the Balinese nasi goreng my friend had taught me, with that distinctive tangy tamarind cutting through the sweetness.
I knew I needed to master it at home. So, armed with a “recipe” from my housemate (you know the type; a dash of this, some of that!), I got to recipe testing.
The secret, of course, is kecap manis: a thick, sweet soy sauce that coats every grain of rice in dark, glossy goodness.
Like in bihun goreng (Indonesian rice noodle stir-fry), the kecap manis caramelises to a toffee-like sweetness, balanced by the saltiness of light soy, the natural umami of tomato paste, and the sour edge of tamarind. Throw in a hit of chilli for warmth, and you’ve got yourself a formula for success.
If you couldn’t tell already, this isn’t your average fried rice.
The flavour is deeper, sweeter, and altogether more complex than you might expect.
It’s not 100% traditional, but like most cuisines, there isn’t one “accepted” way, especially when adapting a recipe to be vegetarian-friendly, like this one. For example, instead of the usual chicken and/or prawns, I’ve used succulent, meaty oyster mushrooms.
❤️ Why You’ll Love Vegetarian Nasi Goreng

🍚 Ingredients You’ll Need For Vegetarian Nasi Goreng
Vegetarian nasi goreng has an almost overwhelming number of ingredients: pantry staples, fresh vegetables, and sauces.
It’s easy to panic when you see a long ingredient list, but I urge you not to. To make things less formidable, I’ve split the ingredients into different categories:
For the Rice and Vegetables:
- Rice: Day-old pre-cooked rice is your secret weapon here. It’s the key to success in any fried rice recipe: freshly cooked rice is too moist and clumps, while old rice is dry and separates perfectly. Use long-grain rice, jasmine rice, or a shorter, fragrant grain (I used sona masoori).
- Neutral oil for stir-frying. You need something with a high smoke point, like vegetable, canola, or groundnut oil.
- Banana shallots are milder and sweeter than regular onions. They’re a mainstay of Indonesian cuisine.
- Red chilli adds colour and a gentle kick. I used bird’s eye chillies.
- Oyster mushrooms bring a meaty texture and natural umami, meaning you won’t miss the traditional meat/seafood. You could also use shiitake mushrooms or chestnut mushrooms.
- Carrot adds sweetness and a bit of crunch.
- Red bell pepper provides colour and a lovely smoky flavour once charred.
- Peas add pops of bright freshness. I used frozen peas for convenience.
For the Sauce
- Light soy sauce provides the salty, umami base. Use reduced-sodium if you’re watching your salt intake.
- Kecap manis is the star of the show. Indonesian sweet soy sauce is thick, syrupy, and deeply flavoured. It’s what gives nasi goreng that signature glossy, caramelised coating. You can find it in most Asian supermarkets or online.
- Tamarind sauce adds tangy, fruity acidity that balances the sweetness of the kecap manis. If you can’t find tamarind sauce, use tamarind paste dissolved in a little water, or substitute with lime juice in a pinch. Note: Indian and Indonesian/Thai tamarind paste is very different; you want the South Asian variety for this recipe.
- Tomato paste brings more natural umami, subtle tanginess, and a touch of sweetness. You only need a touch.
Some recipes also suggest adding a dash of fish sauce (we’d use vegan fish sauce, of course) for pungency. That’s optional, as it’s a more obscure ingredient; I like NISH, which is frequently stocked in Holland and Barrett, and always available on Amazon.
For the Garnishes:
Garnishes are crucial to vegetarian nasi goreng; the dish isn’t complete without them.
- Cucumber adds cool, refreshing crunch. It’s traditional and provides the perfect contrast to the warm, rich rice.
- Tomato is another classic garnish. They add juiciness and a bit of acidity.
- Spring onions scattered over the top add freshness and a gentle onion flavour.
- Lime brightens everything up. Essential.
- Banana shallots fried in oil until golden and crispy add an incredible crunchy texture, not to mention the sweet caramelised flavour. If you don’t feel like the extra faff of cooking these, you can buy fried onions or fried shallots from your local Asian store or Amazon.
- Eggs, either fried sunny-side up or made into an omelette, are a traditional accompaniment to nasi goreng. If you’re vegan, you can skip this entirely, or substitute with a vegan egg or crispy fried tofu.
Adapting This Recipe For Allergies and Dietary Requirements
This vegetarian nasi goreng is naturally vegetarian, dairy-free, and nut-free.
It can easily be made vegan by simply omitting the fried egg on top. The fried rice itself is completely vegan. You could add fried tofu or a vegan fried egg on the side instead.
For a gluten-free version, you’ll need to swap the soy sauce and kecap manis, since both are made with wheat.
Use tamari instead of light soy sauce (add a pinch of salt; tamari is much closer in flavour to dark soy sauce), and create your own kecap manis by mixing tamari with equal amounts of palm sugar, molasses, or dark brown sugar. The flavour may not be identical, but it will still be delicious.
Unfortunately, this recipe can’t be made soy-free. The soy is too intrinsic to the flavours, but you can check out my collection of soy-free recipes for more inspiration.
🌶️ Substitutions and Swaps
If you can’t find kecap manis, make your own. Mix two parts palm sugar (alternatively, use dark brown sugar or molasses) with three parts dark soy sauce. Heat it gently until the sugar dissolves. It won’t be quite as complex, but it’s a solid substitute in a pinch.
No tamarind sauce? Lime juice works in a pinch. Use about 1 tablespoon, or mix a little rice vinegar with a pinch of brown sugar for a closer match. Indonesian tamarind sauce is a balance of fruity, tangy, and sweet.
In terms of vegetables, thisvegetarian nasi goreng is endlessly flexible. You can use whatever vegetables you have in the fridge: green beans, baby corn, pak choy, beansprouts, broccoli, celery, cabbage, or water spinach.
(P.S.: check out my fantastic stir-fried morning glory recipe if you love water spinach!)
You can also add more protein. Pan-fry tofu or tempeh, then stir through the fried rice; this is the same technique I use in my Thai basil fried rice recipe.
Alternatively, use a meat substitute such as vegan shrimp or chicken for a real “can’t tell the difference” effect. These can be found in supermarkets or large Asian grocery stores (large Buddhist populations in many Asian countries mean mock meats are abundant!).
Finally, adjust the spice level to your preference. Vegetarian nasi goreng is mildly spicy, but you can remove the spice altogether, mellow it by de-seeding your chilli, or double/triple the amounts if you like things fiery.
🧑🍳 How to Make Vegetarian Nasi Goreng (Photos)

One: In a small bowl, combine kecap manis, light soy sauce, tamarind sauce, and tomato paste to make your stir-fry sauce.
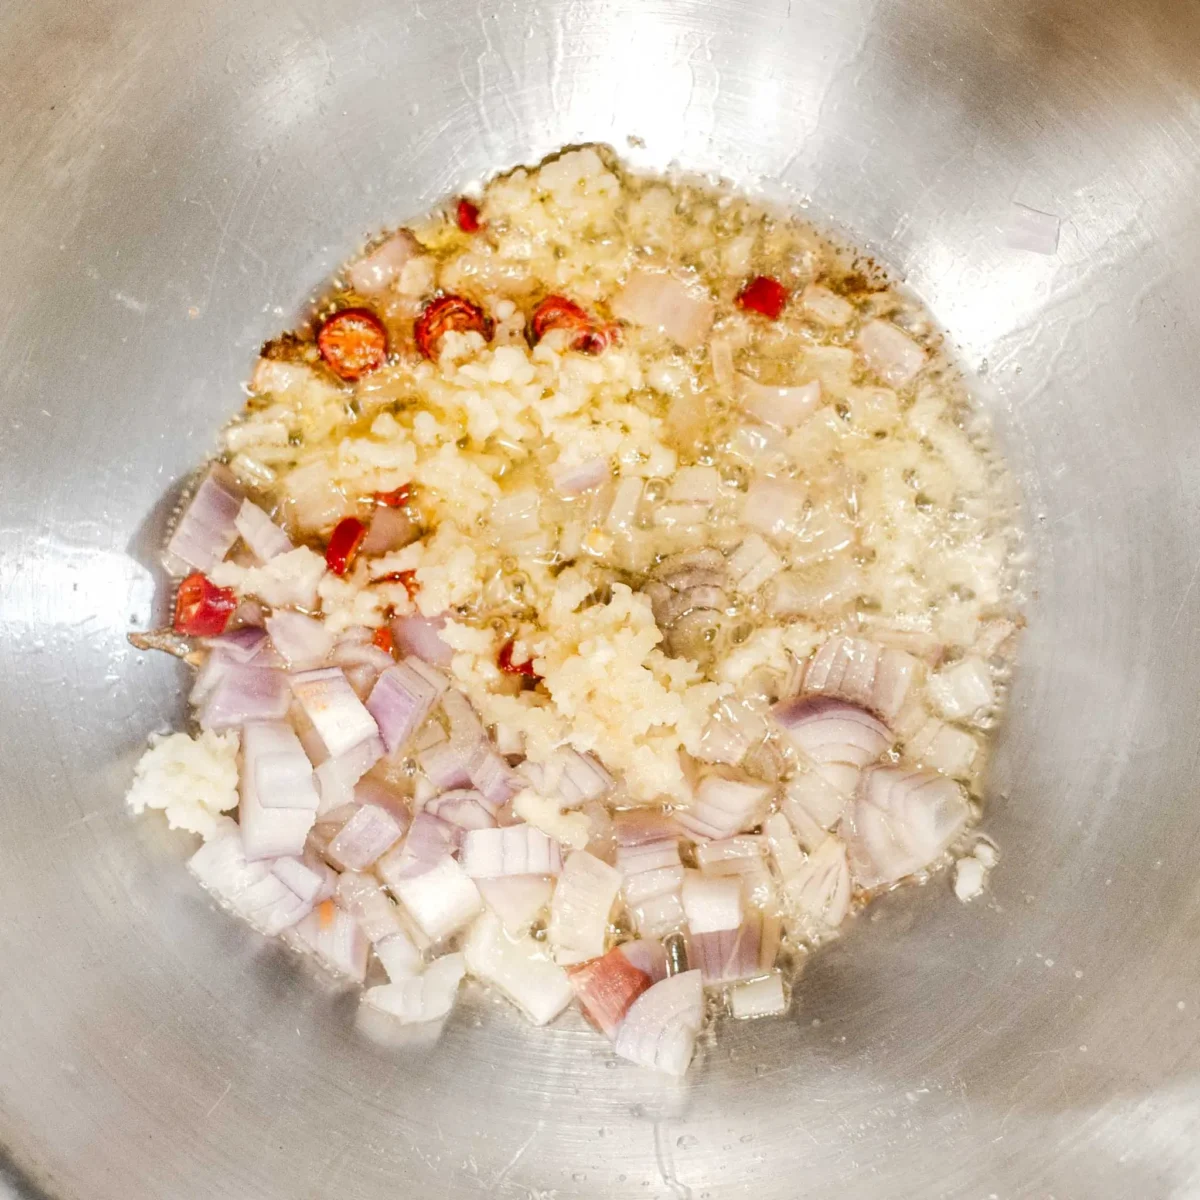
Two: Heat oil in a large wok until smoking hot. Add chopped shallot, minced garlic, and sliced red chillies. Fry until aromatic.

Three: Add finely diced carrot to the wok. Stir-fry for a few seconds.

Four: Next, add the oyster mushrooms.

Five: Cook until the oyster mushrooms have released water and softened slightly.

Six: Add your finely chopped bell pepper and peas.

Seven: Mix well and stir-fry for a minute or so, until the vegetables and mushrooms are fully cooked.

Eight: Add the day-old rice to the pan. I break it up with my (clean) fingers before adding it.

Nine: Pour your stir-fry sauce over the top of the rice. Immediately mix the stir-fry sauce into the rice.

Ten: Stir-fry for a minute or two, to infuse the vegetarian nasi goreng with a smoky flavour.
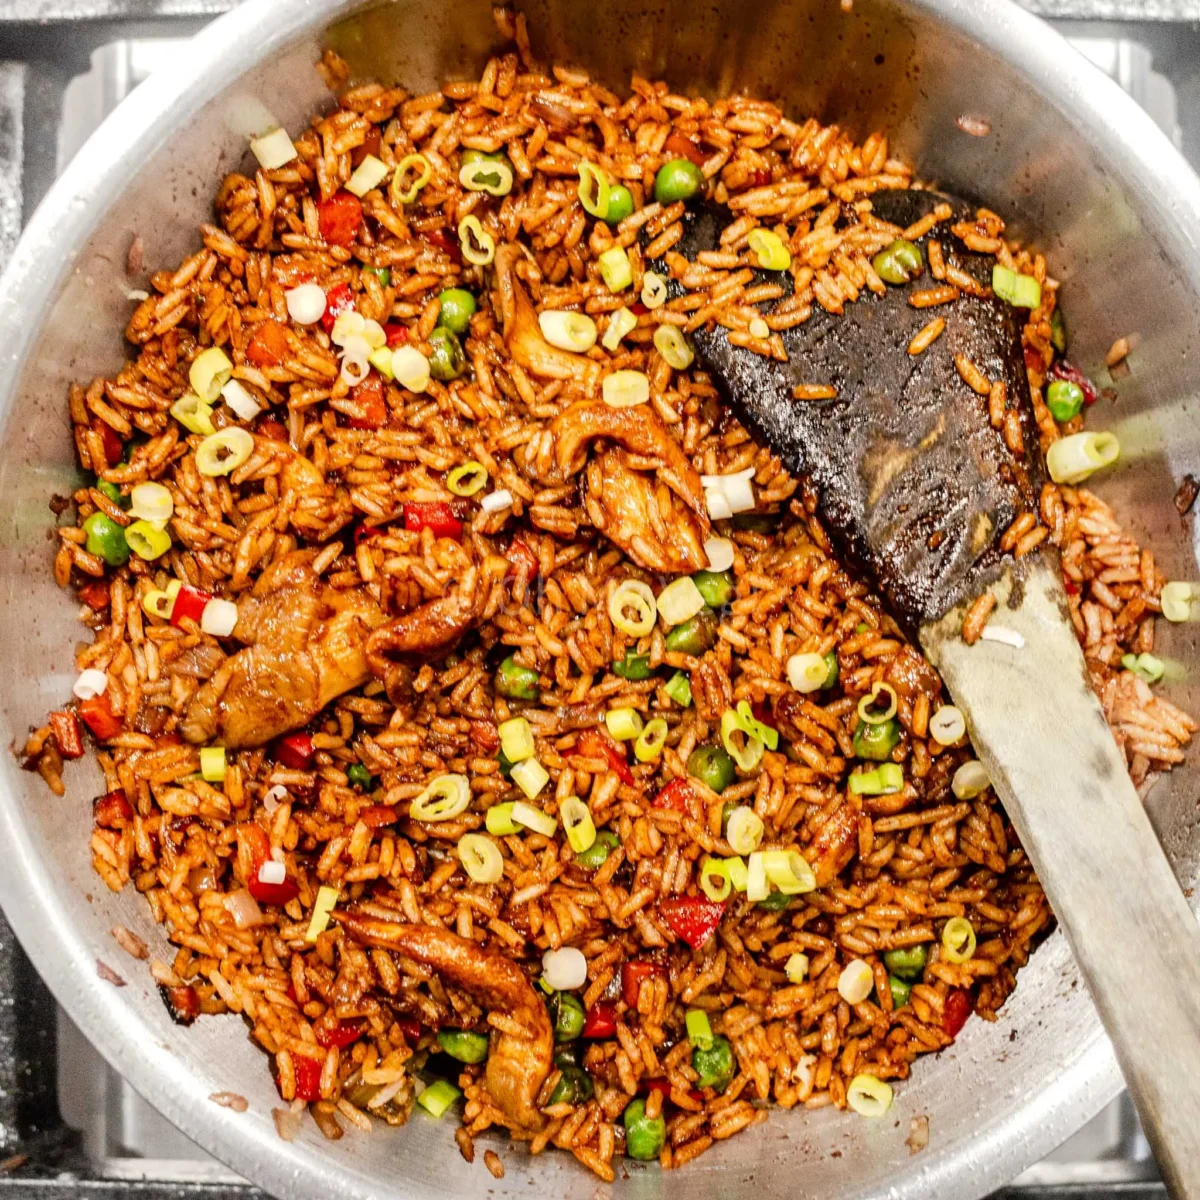
Eleven: Garnish your rice with chopped scallions/spring onions, and turn off the heat.

Twelve: Heat oil in a frying pan. Crack your eggs into the pan and cook “sunny side up,” meaning the edges are crispy, the whites are set, and the yolk is runny. Don’t flip your egg.

Thirteen: If making your own fried shallots, slice them finely and deep-fry (or shallow-fry) until crispy.

Fourteen: Serve your vegetarian nasi goreng scattered with crispy shallots, a fried egg, cucumber slices, and tomato wedges.
Remember, the complete recipe (with ingredient quantities and instructions) can be found at the bottom of this page. You can also print the recipe, save the recipe, adjust the servings, and much more from there!
⭐ Top Tips For Perfect Vegetarian Nasi Goreng
Using cold, old rice is absolutely non-negotiable. Warm, freshly cooked rice turns mushy. Conversely, day-old rice dries out, meaning the grains stay separated when stir-fried.
Like other stir-fry recipes (such as pad krapow, morning glory stir-fry, or stir-fried glass noodles), high heat is essential. Your wok needs to be hot enough to smoke. The ingredients should sizzle when they make contact. This is what creates flavour.
Finish your prep work first. Always have your aromatics and vegetables pre-cut, and your sauces mixed before you turn the heat on. Once your wok is hot, it’s show time … you won’t have time to be mincing garlic.
Let the rice sit. I know tossing things around in a wok is fun, but you’ve got to resist the urge to keep things moving 24/7. Letting the rice sit for 30 seconds now and then allows it time to caramelise and develop that really smoky flavour.
Taste and adjust. While I think this recipe is pretty bang on (not to toot my own horn!), different brands vary wildly. Taste the recipe before serving: if it needs more salt, add a splash of light soy or vegan fish sauce. If you want it tangier, squeeze in lime. Sweeter? A tiny bit more kecap manis, or a dash of palm sugar. This intuitive adjusting is what will make you a great chef.

❄️ Storing Vegetarian Nasi Goreng
Fridge: Cool the rice, transfer to an airtight container, then refrigerate for up to three days.
I don’t recommend storing the garnishes. Fried eggs don’t reheat well, so are best made fresh. Crispy fried shallots lose their texture when stored, so add a fresh portion to your serving after reheating. Tomatoes and cucumbers should be stored separately.
Reheat: In a hot pan or wok for the best texture. This lets you crisp the rice up again — sometimes, I tend to think it tastes even better when reheated!
If your rice is too dry, add a tablespoon of water and cover the pan. The steam will soften the rice, but you’ll lose that “stir-fried” texture.
You can also microwave the vegetarian nasi goreng in 1-minute bursts, stirring between each zap. Again, you lose that smoky caramelised texture from real stir-frying.
Freezing vegetarian nasi goreng is inadvisable. In my experience, rice becomes gummy when frozen and then reheated. It doesn’t make for a pleasant eating experience.
🥠 Serving Suggestions For Vegetarian Nasi Goreng
First and foremost, garnishes are obligatory. Top with a fried egg, scatter with crispy fried shallots, and serve with cucumber slices, tomato wedges, and lime.
Add vegan prawn crackers (kerupuk udang) for more crunch; acar (Indonesian vegetable pickles) for sour tang; and sambal oelek or sambal matah for spicy complexity.
In Indonesia, Malaysia, and other countries that enjoy nasi goreng, it’s mostly enjoyed as a breakfast food, although it can be eaten at any time of the day.
If you’re serving this for lunch or dinner, make vegetarian nasi goreng a complete meal by serving it alongside vegetable satay skewers, fried oyster mushroom “chicken”, or vegetable sides like braised bok choy.
If you’ve tried this vegetarian nasi goreng recipe, please drop a comment ✍️ or a star rating 🌟 below to help fellow readers! Additionally, if you have a question, please drop a comment, and I’ll do my best to answer ASAP.

Vegetarian Nasi Goreng
Ingredients
For the Vegetarian Nasi Goreng
- 1 ½ tablespoons neutral oil
- 50 grams banana shallot finely chopped
- 2 large cloves garlic finely minced
- 1 red chilli finely sliced
- 50 grams carrot finely chopped
- 100 grams shiitake mushrooms torn into clusters
- 50 grams red bell pepper finely chopped
- 50 grams peas
- 300 grams cooked, day-old rice
For the Sauce
- 1 teaspoon light soy sauce
- 1 ½ tablespoons kecap manis
- 1 ½ tablespoons tamarind sauce
- 1 ½ teaspoon tomato paste
For the Fried Eggs
- 2 teaspoons neutral oil
- 4 medium eggs
- salt and black pepper to taste, optional
For the Garnishes
- 1 spring onion/scallion finely chopped
- 150 grams cucumber sliced (150g = half an English cucumber)
- 1 large tomato cut into wedges
- 1 lime cut into wedges
- 60 grams crispy fried shallots 1
Instructions
Prep The Ingredients
- Clean, peel, and cut all your aromatics and vegetables. Details on cutting technique can be found in the ingredients section above.
- In a small bowl, combine 1 teaspoon light soy sauce, 1 ½ tablespoons kecap manis, 1 ½ tablespoons tamarind sauce, and 1 ½ teaspoon tomato paste . Stir to combine. This is your stir-fry sauce.
Make the Vegetarian Nasi Goreng
- Add 1 ½ tablespoons neutral oil to a large wok or pan. Bring the oil to a smoking point.
- Add 50 grams banana shallot (finely chopped), 2 large cloves garlic (minced), and 1 red chilli (finely sliced) to the oil. Stir-fry for a few seconds, until aromatic.
- Next, add 50 grams carrot (finely chopped). Stir-fry for 30 seconds.
- Take 100 grams shiitake mushrooms and tear them into small clusters. Add to the pan and stir-fry for a few minutes, until the mushrooms have released water, softened, and slightly charred.
- Add 50 grams red bell pepper (finely chopped) and 50 grams peas to the pan. Toss to mix, and stir-fry for an additional minute.
- Use your hands to break up 300 grams cooked, day-old rice. Add the rice to your pan.
- Pour the stir-fry sauce you prepared earlier over the rice. Immediately stir and toss to coat every grain of rice in your sauce. Let the rice stir-fry for a few minutes. Don't toss constantly — letting it sit for 30 seconds will get it lovely and caramelised, with plenty of flavour.
- Garnish with 1 spring onion/scallion (finely sliced). Turn off the heat.
Make the Fried Eggs
- In a non-stick frying pan, heat 2 teaspoons neutral oil. Crack in 4 medium eggs. Cook on medium heat until the edges are crispy and the whites are set, but the yolks are still runny. No need to flip the eggs; this is "sunny side up"-style.
- Top the eggs with salt and black pepper to taste.
Garnish the Vegetarian Nasi Goreng
- Portion your vegetarian nasi goreng onto plates.
- Slice 150 grams cucumber. Cut 1 large tomato into wedges. Cut 1 lime into quarters. Allocate a portion of these garnishes between each serving.
- Portion 60 grams crispy fried shallots 1 out for each plate. Scatter over the top or plate on the side.
- Serve hot.
Notes


Nutrition
🔎 Find More Recipes to Love


❓FAQ
Every recipe for nasi goreng will vary in spice level.
This vegetarian nasi goreng recipe has a gentle warmth from the fresh red chilli, but it’s overwhelmingly fiery. You can easily control the heat by adjusting the amount of chilli you use, de-seeding, or leaving it out entirely.
If you want it spicier, add extra chilli, a splash of sriracha, or serve it with sambal oelek on the side.
Absolutely; skip the fried egg on top. The rice itself is already vegan. For extra protein, top with crispy fried tofu, tempeh, or a vegan fried egg (Yes, that really exists!).
There is a wide variety of fried rice across Asian cuisines. The dish is popular in Chinese, Thai, Indonesian, Malaysian, Indian, Japanese, and Indo-Chinese cuisines (plus many more!).
Nasi goreng is Indonesia’s most famous and widespread iteration of fried rice.
It stands out thanks to its use of kecap manis: a thick, sweet Indonesian soy sauce that gives dishes like nasi goreng and bihun goreng their characteristic dark colour and caramelised, sweet-savoury flavour.
Nasi goreng also tends to be richer and more complex than standard fried rice, with deeper umami notes. This Balinese version adds tamarind sauce for a tangy edge you won’t find in most fried rice. The cooking technique is similar, but the flavour profile is completely different.
Yes. While vegetarian nasi goreng doesn’t freeze well, it’s still a great meal prep option. Cook a big batch and divide it into portions, then store it in the fridge for up to three days. Make the fried egg fresh each time you serve. Everything else can be made ahead and reheated.
No, although a wok makes the job easier because of the high, sloped sides that let you toss everything without rice flying everywhere.
A large, wide frying pan, skillet, or Indian kadai works perfectly well. Just make sure it’s big enough that the rice isn’t crowded. Remember, you want it to fry, not steam.
If you can, I really recommend storing your fresh rice and using it tomorrow instead.
Freshly cooked rice is too moist, meaning the grains stick together when fried. That results in a mushy texture, rather than the crisp yet soft one we’re looking for.
If you must, cool the rice completely, then spread it in a thin layer on a baking tray and pop it in the fridge for at least an hour, or in the freezer for 20-30 minutes. Break it up with your fingers before using.